Apple in the Enterprise: Securely Connect iOS and OS X to a Windows Server 2012 VPN
/Reasons for Setting Up a VPN for Your Company
While it can sometimes be difficult to get Apple and Microsoft to integrate well in the enterprise, the consumerization of technology has driven the need to explore this space. As mobile technologies are certainly going to gain even further in popularity, it is important for workers to be able to access office resources from remote locations and have a method of protecting their communications when connected to insecure Wi-Fi hotspots. For these reasons and many more, it is imperative that even small businesses have some sort of VPN technology that works across the range of devices used throughout their business.
Many VPN solutions exist, but for those companies that cannot afford a high-end Cisco or Juniper solution, a regular Windows Server 2012 installation can be used to provide VPN access into your network. Of course, there are many considerations around secure placement of a VPN solution on your network and these considerations will be discussed in another article. For now, know that putting a VPN server on your network involves exposes some internal resources to the outside world and this should only be done cautiously. Remember to always patch your servers!
Due to the limited overlap in VPN protocol support between Microsoft and Apple, we will be using L2TP as the VPN protocol in this scenario. There are three steps to complete the setup process:
- Configure VPN on the Windows Server 2012 system using the Routing and Remote Access service. While I will be writing "Windows Server 2012" throughout this post, the same steps will work on Windows Server 2012 R2. This post assumes that the Server 2012 system being used is part of a small Active Directory domain.
- Forward ports on the perimeter router to the Server 2012 system.
- Configure VPN connections on OS X and iOS devices.
Configure Windows Server 2012 and Port Forwarding
Install Necessary Server Roles for VPN
- Prerequisites:
- Windows Server 2012 or 2012R2 system which has two NICs installed and configured with static IPs,
- Be logged onto this system with a Domain Admin account.
- Install the "Remote Access" and "Network Policy and Access Services" roles.
- When selecting the role services for Network Policy and Access Services, only "Network Policy Server" needs to be installed.
- When selecting the role services for Remote Access, only "DirectAccess and VPN (RAS)" needs to be installed.

Configure VPN in Routing and Remote Access
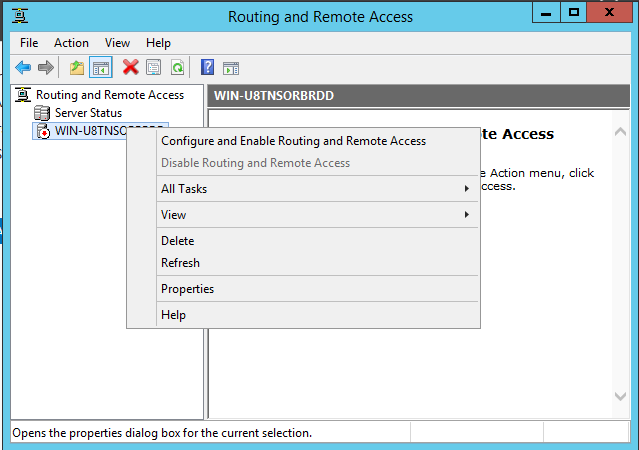
- In Server Manager, select Remote Access, right-click your server, and open the Remote Access Management Console. In that console, click "Run the Remote Access Setup Wizard."

- Choose "Deploy VPN Only," which will bring up the Routing and Remote Access window.
- Right-click the server and choose "Configure and Enable Routing and Remote Access"
- On the "Configuration" screen of the wizard, choose the first option, "Remote access (dial-up or VPN)" and click Next.
- Select the "VPN" check box on the "Remote Access screen, then click Next.
- On the next page, "VPN Connection," you must select a network interface which will receive incoming VPN traffic from the Internet. Since we are setting up this VPN server behind a NAT router, you can select either interface as long as the traffic is forwarded to that interface from the router.
- Also, you can uncheck the box, "Enable security on the selected interface..." because this filtering is unnecessary when the server is behind a NAT router. It is certainly more secure to have Static Filters enabled to restrict this interface to only VPN traffic, but in a small business environment where this server may be sitting in the same network segment as other servers, the Static Filters might make management unnecessarily difficult. Click Next.
- If you have a DHCP server on your network, select the "Automatically" option to use that DHCP server to assign addresses to VPN clients. Click Next.
- Choose the "No, use Routing and Remote Access to authenticate connection requests" option. This will force the VPN to use the Network Policy Server which was installed alongside the VPN role to authenticate and authorize VPN connections. Click Next, then click Finish.
- Note: If you receive an error saying that the system could not be registered as a valid remote access server within Active Directory, you must manually add the computer object as a member of the "RAS and IAS Servers" group. Membership in this group allows servers to access the remote access properties of user objects.
- Right-click the server in the Routing and Remote Access window and select "Properties."

- On the Security tab of the Properties dialog, check the option for "Allow custom IPsec policy for L2TP/IKEv2 connection" then enter a Preshared Key. This preshared key will be used by VPN clients to authenticate the VPN server. Click OK to close the dialog and apply the settings.
Configure Users and Groups for VPN Access Authorization
Since this guide is meant for a small organization with an Active Directory domain, we can use Active Directory Users and Groups to control the authentication and authorization for VPN access. To do this, simply:
- Create a new Active Directory group, called "VPNUsers" for this example, and populate it with the users that will be able to use the VPN.
- In order for this to work, all Active Directory users must have the "Control access through NPS Network Policy" option selected on the Dial-in tab of each user's properties dialog. Fortunately, this is the default option, so no work needs to be done unless changes were made to those user attributes prior to implementing this VPN.
Configure Authentication and Authorization Policies in Network Policy Server
- Back in the Routing and Remote Access window, click the "Remote Access Logging & Policies" folder under the active server. Then, right-click and select "Launch NPS."
- Right-click Network Policies and select New.
- Name the policy "L2TP," leave the rest of the defaults on this first page, then select Next.
- On the Specify Conditions page, click Add, and select Tunnel Type. In the resulting dialog, select "Layer Two Tunneling Protocol (L2TP)" and click OK.
- Still on the Specify Conditions page, click Add, and select User Groups. In the resulting dialog, select Add Groups and add the "VPNUsers" group we created in the last section. Click Next.
- Make sure this policy is set to Grant Access to the network. Click Next.
- On the Configure Authentication Methods page, make sure the only check box selected is "Microsoft Encryption Authentication version 2 (MS-CHAP-v2)." Click Next.
- On the Configure Constraints page, set the Idle Timeout to 120. Click Next.
- On the Configure Settings page, go to the Encryption section and make sure only the check box for "Strongest encryption (MPPE 128-bit)" is selected. Click Next, then click Finish.
When NPS has been configured completely, there should be a policy with the following settings:

Forward VPN Ports to Server
In order to get this VPN working, traffic needs to be able to get to the VPN server from the Internet. To do this, configure your router to forward any UDP traffic on the following ports to your VPN server:
- 500
- 4500
- 1701
Setup OS X and iOS Clients to Use VPN
Configure OS X to Connect to VPN
This configuration was done on OS X 10.10. There are some older versions of OS X (at least 10.6) which implemented L2TP using non-standard network ports and, therefore, will not work with this VPN solution. However, I believe all newer versions of OS X have been implemented with standard ports. You need to be able to administer your OS X installation to set this up.
- Open System Preferences and go to the Network panel.
- On the bottom left, click "+" to add a new network connection. In the resulting dialog, change the Interface to VPN. Make sure "L2TP over IPsec" is selected as the VPN Type. Change the Service Name to a descriptive name, then click Create.
- Select the new VPN connection and fill in the following settings:
- Server Address should be filled in with the IP address or FQDN of your external interface.
- Account Name should be filled in with the Active Directory username you will use to connect to the VPN. Remember that this account must be a member of the "VPNUsers" group for it to be authorized to connect.
- Server Address should be filled in with the IP address or FQDN of your external interface.
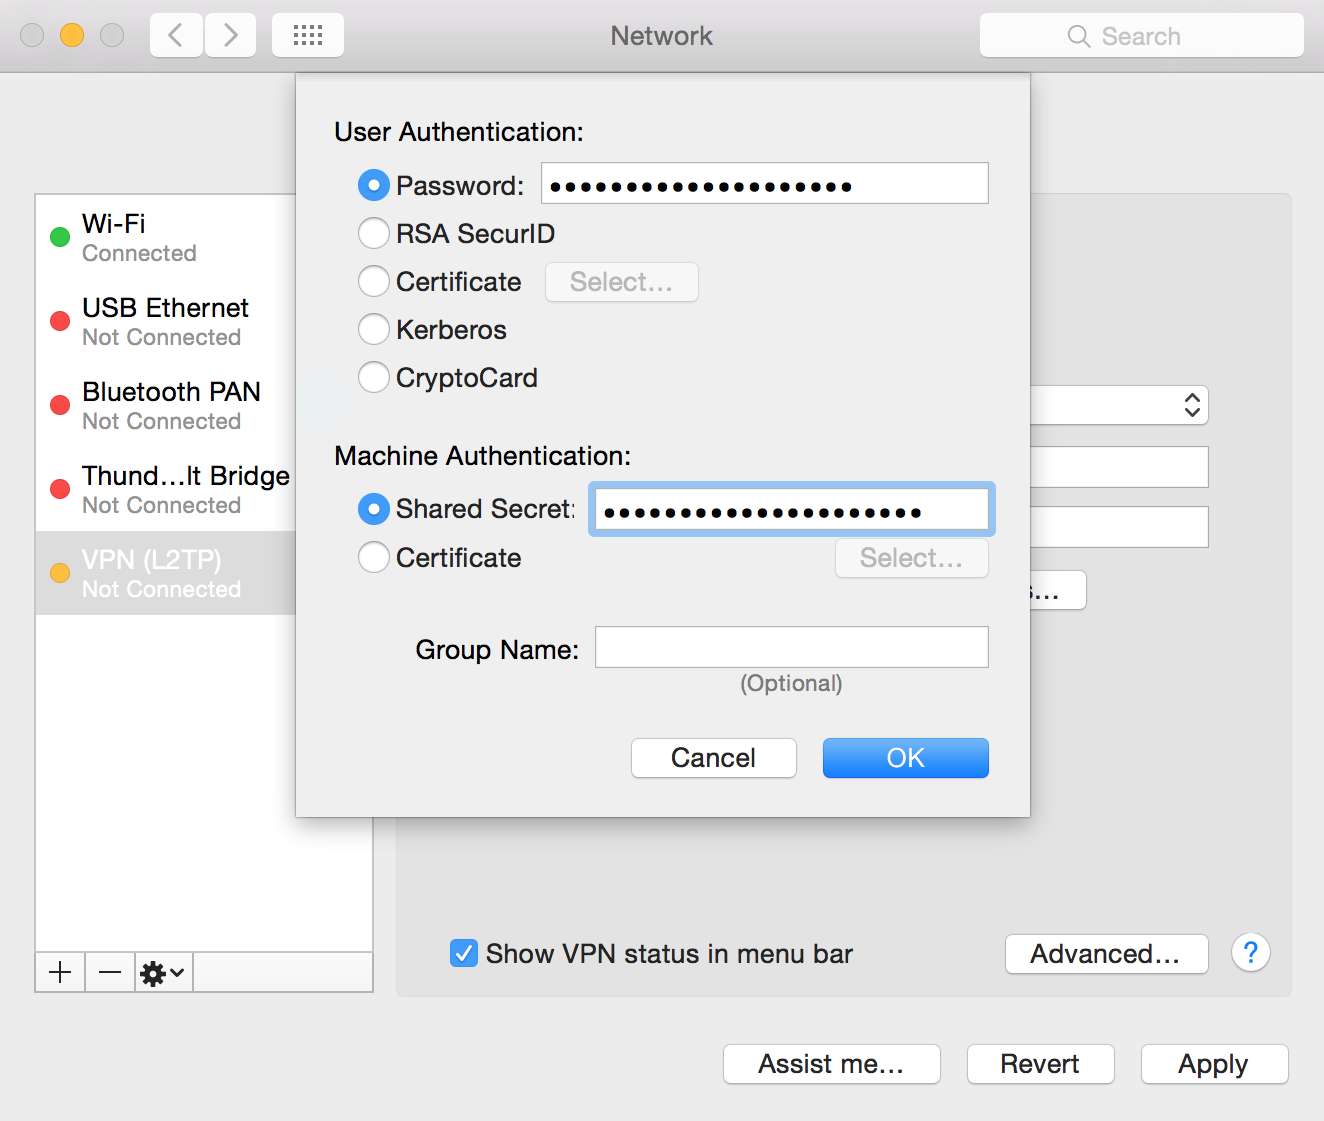
- Click "Authentication Settings..." and fill in the following settings:
- Under User Authentication, "Password" should be filled in with the Active Directory account's password.
- Under Machine Authentication, the "Shared Secret" should be setup with the Shared Secret that was defined on the Security tab of the remote access server properties dialog.
- Click OK to close the dialog.
- Under User Authentication, "Password" should be filled in with the Active Directory account's password.
- Click "Advanced..." and make sure the "Send all traffic over VPN connection" option is selected. This will ensure that all traffic is protected by the VPN's encrypted tunnel. Click OK to close this dialog.
- Click Apply.
- To connect, you can click "Connect" in this page or select the option to show the VPN status in the menu bar. You can then control the VPN connection from that menu bar icon.
Configure iOS to Connect to VPN
This configuration was performed on iOS 8, but the configuration should work on older versions of iOS as well.
- Open Settings.
- Select VPN.
- Click "Add VPN Configuration..."
- Select "L2TP" at the top.
- Fill in the following:
- Description: a description of the connection
- Server: the FQDN or IP address of the VPN's external interface
- Account: the name of the Active Directory account that can access the VPN
- RSA SecurID: make sure this option is unselected
- Password: password of the Active Directory account
- Secret: Shared Secret configured in the remote access server properties
- Send All Traffic: make sure this option is selected.
- Description: a description of the connection
- Click Save.
- To connect, simply make sure the appropriate VPN configuration is selected, then click the button near the top of the screen.