Default Encryption Settings and Behaviors for OneNote 2013 (Office 365)
/
Context: Encryption for Office Products
In the beginning of password protection features for Microsoft Office products, protection was poorly implemented and nearly trivial to crack. Over the years, protections were improved. In Office 2007, the state of protection improved significantly when AES became the default cipher for encrypting documents. Since then, incremental improvements have brought us to the state of Office document protection today.
Office 365 Encryption Settings and Behavior for OneNote 2013
This post will examine the default settings and behaviors for the encryption of OneNote 2013 notebook sections when OneNote has been installed as part of Office 365 Home.
Although this Microsoft TechNet post purports to discuss Office 2013 encryption settings, it is clearly out of date. It states that the default encryption algorithm in use is AES with a 128-bit key length. However, I found this to not be the case. Let's examine more closely below.
Clear-Text Sections
The following is a screenshot of the format of a clear-text OneNote section as viewed in Notepad++.
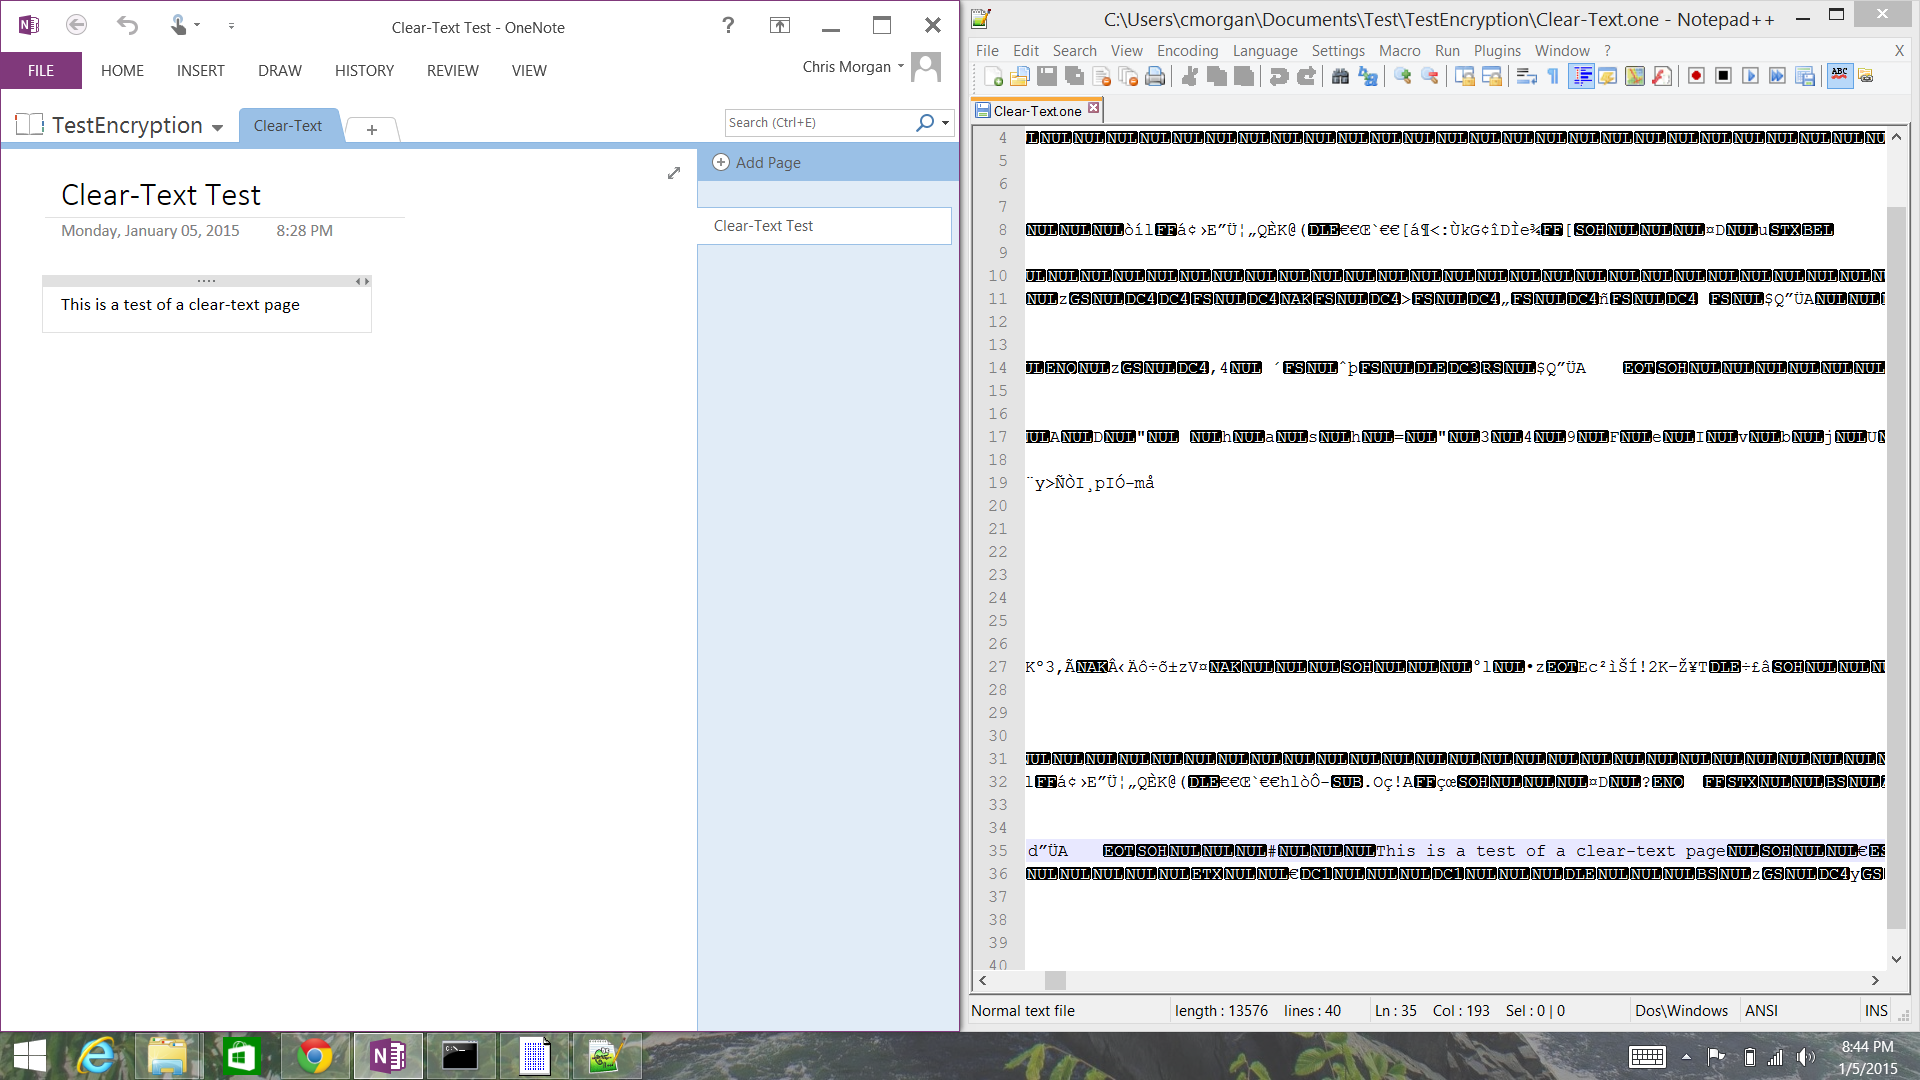
As shown in the side-by-side comparison, it is trivial to pull the content from a clear-text section of OneNote.
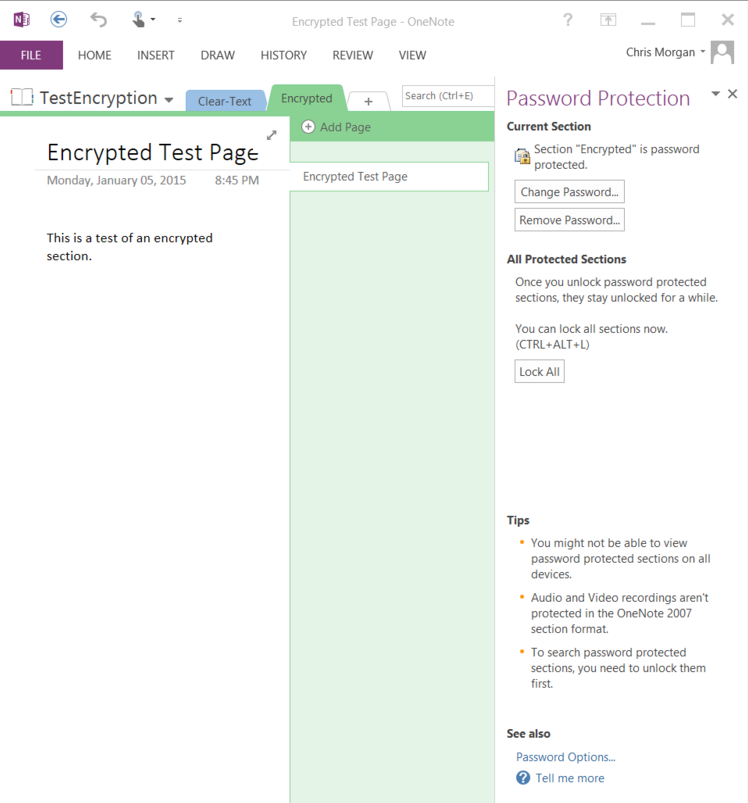
Password Protect a OneNote Section
If encryption is desired for a OneNote section, right-click the tab for the section, then select "Password Protect This Section..." This will open the Password Protection dialog, which will allow you to set the initial password, then change or remove that password once the section has been protected. While this is benignly called "Password Protection," the actual action that is occurring is a little more complex. The entire section is being encrypted so that is can be stored securely in the filesystem.
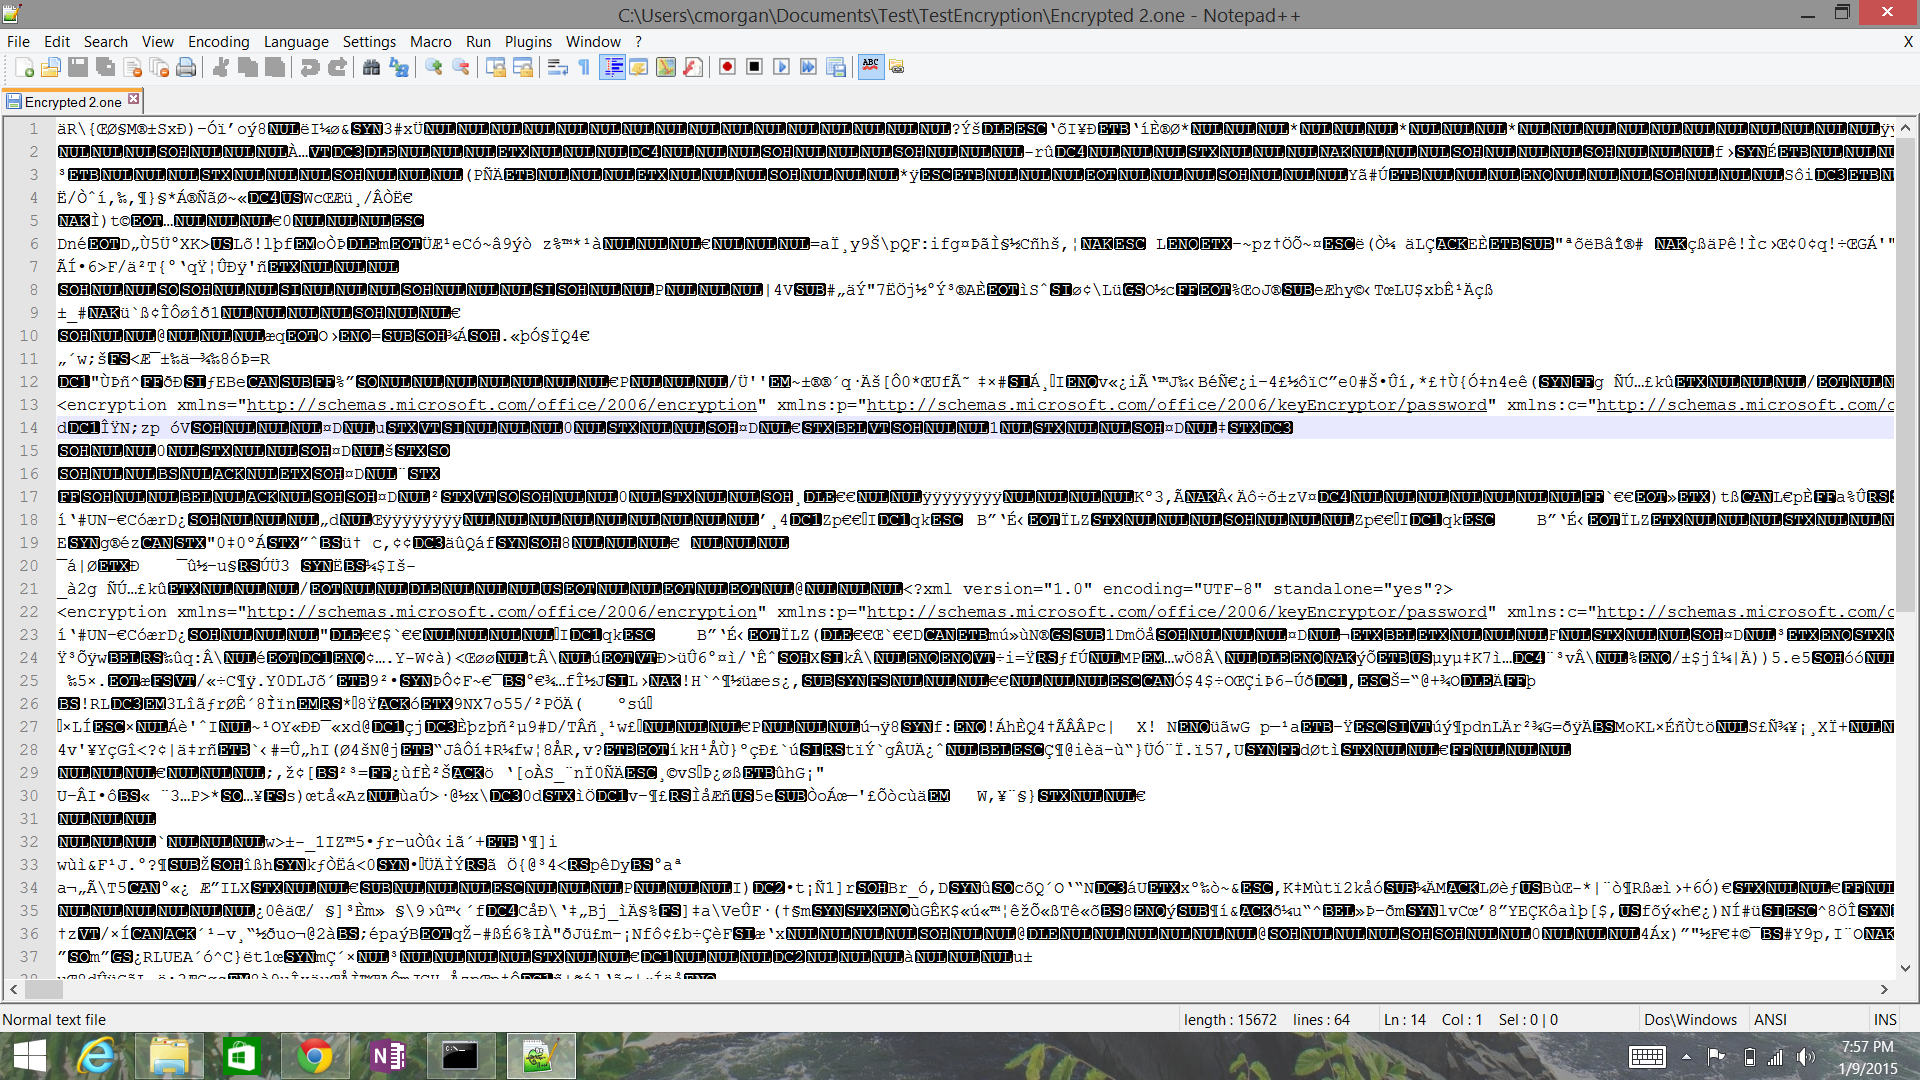
Default Encryption Settings for OneNote 2013
As is clearly shown in the screenshot below and described in the TechNet article above, OneNote 2013 is using AES as the cipher algorithm for encryption OneNote sections. However, it is also clear that the key length is set to 256 bits, which is contrary to the defaults noted in the TechNet article.

Remember that the new Office document formats are based on XML, so the snippet of settings shown in the screenshot above are actually in XML format. The full string of encryption settings for the OneNote section is here (formatted with each element split out to make it slightly more readable):
<encryption xmlns="http://schemas.microsoft.com/office/2006/encryption" xmlns:p="http://schemas.microsoft.com/office/2006/keyEncryptor/password" xmlns:c="http://schemas.microsoft.com/office/2006/keyEncryptor/certificate">
<keyData saltSize="16" blockSize="16" keyBits="256" hashSize="64" cipherAlgorithm="AES" cipherChaining="ChainingModeCBC" hashAlgorithm="SHA512" saltValue="LN7TixtxYaLw+KPpE9Fu/Q=="/> <keyEncryptors>
<keyEncryptor uri="http://schemas.microsoft.com/office/2006/keyEncryptor/password">
<p:encryptedKey spinCount="100000" saltSize="16" blockSize="16" keyBits="256" hashSize="64" cipherAlgorithm="AES" cipherChaining="ChainingModeCBC" hashAlgorithm="SHA512" saltValue="Wlbbi96Vg205rxotlDJ0yQ==" encryptedVerifierHashInput="FnwLq7c4yJnWKWSlTk9p6w==" encryptedVerifierHashValue="um/vjrbuSS0l2Adr1KS0EHL8V1DAwnOrpOG3t385ah35Fg/KdZ648F/eY6I+KwJUgv8kPwZZmJdVc8vf1DLECA==" encryptedKeyValue="AJzGS4z0YDQvnNhCH6fFIQUoPZWP3BGqY9sgiajybiQ="/>
</keyEncryptor></keyEncryptors></encryption>
There are a few items to note from this string of encryption settings:
- First, the settings being employed are AES-256 in CBC mode, using SHA-512 for any hashing operations performed during the encryption. At the time of this writing, these default cipher and hash algorithms are essentially state of the art in terms of the cryptography being commonly used in the industry. Although SHA-3 is now available, it is not commonly employed yet, and SHA-512 is a very strong hashing algorithm.
- Second, there is a right way to generate encryption keys and many wrong ways to generate encryption keys. Microsoft has appeared to create a method of properly and securely generating keys with which to encrypt documents from the Office suite. Passwords are not simply hashed once then used as a key for the cipher, which would open up the document encryption to rainbow table attacks that have pre-generated hashes for passwords. Instead, passwords are combined with a salt and hashes are iterated many times over.
- All attributes which are randomly generated or result from encryption processes, such as the saltValue and encryptedKeyValue attributes, are base64-encoded for storage. Therefore, any usage of these values must be preceded by base64 decoding.
Encryption Process for Office 2013 Documents
Office 2013 documents adhere to Microsoft's ECMA-376 Document Encryption standard.
Using the encryption settings described in the XML string, we can determine that the encryption process used for this OneNote 2013 section more specifically worked as such (slightly simplified for readability):
- The user's password was combined with a randomly generated salt of 16 bytes.
- This (salt + password) was hashed using the algorithm specified in the hashAlgorithm attribute of the "p:encryptedKey" element under the "keyEncrypter" element. In this case, that algorithm was SHA-512.
- This hash is then iterated over itself according to the number of times specified in the spinCount attribute, which was 100,000. This step is performed to slow down brute force attempts to find the password.
- The hashing process in the previous step came close to generating the user's encryption key, but that hashing process generated a 512-bit output. Therefore, the hash function's final output is truncated to match the keyBits attribute's value, measured in bits. This truncated value is the user's encryption key.
- A random array of bytes is then created that is the size specified in the keyBits attribute of the "keyData" element. This is referred to as the intermediate key and in this case it was a 256-bit key which was generated.
- The OneNote section is then encrypted with the cipher algorithm specified in the keyData element's cipherAlgorithm attribute, which is AES in this case. The initialization vector for this encryption process is the keyData element's saltValue and the intermediate key generated in Step 5 is used as the encryption key. All blocks in the encryption process are the size specified in the keyData elements' blockSize attribute, measured in bytes.
- Finally, after encryption has completed, the intermediate key is stored in the p:encryptedKey element's "encryptedKeyValue" attribute. To ensure it is stored safely, the intermediate key is encrypted with the cipher specified in the p:encryptedKey element's "cipherAlgorithm" attribute. This encryption process uses the user's encryption key generated in Step 4, with the keyEncrypter elements's "saltValue" attribute as the initialization vector.
Note from the process above that the user's password is not used to directly generate the key which is responsible for encrypting the OneNote section. Instead, the user's password is used to generate an encryption key which is used to encrypt a random value generated to be used as the OneNote section's encryption key.
For the curious, the encryptedVerifierHashInput and encryptedVerifierHashValue attributes are used for verifying the user's password before starting the decryption process. The encryptedVerifierHashInput value is created by generating a random value the same size as the saltSize, then encrypting it with the user's encryption key. The hash of that decrypted random value is then encrypted with the user's encryption key. To validate the user's password before decrypting, the encryptedVerifierHashInput value is decrypted and hashed, then compared to the decrypted value of the encryptedVerifierHashValue attribute.
Finally, for the observant cryptography enthusiast, you may have noticed that I keep saying "user's encryption key" for all of these various encryption functions which have occurred (other than the intermediate key, of course). This would open up this encryption scheme to a number of attacks. For each of the encryption processes which occur to create the encryptedVerifierHashInput, encryptedVerifierHashValue, and encryptedKeyValue attributes, Microsoft actually specifies different blockKey values which must be hashed one more time with the final iteration of the spinCount hashing process. This creates unique encryption keys for each of these elements.
Now, let's examine what happens when we change the password of an encrypted section.
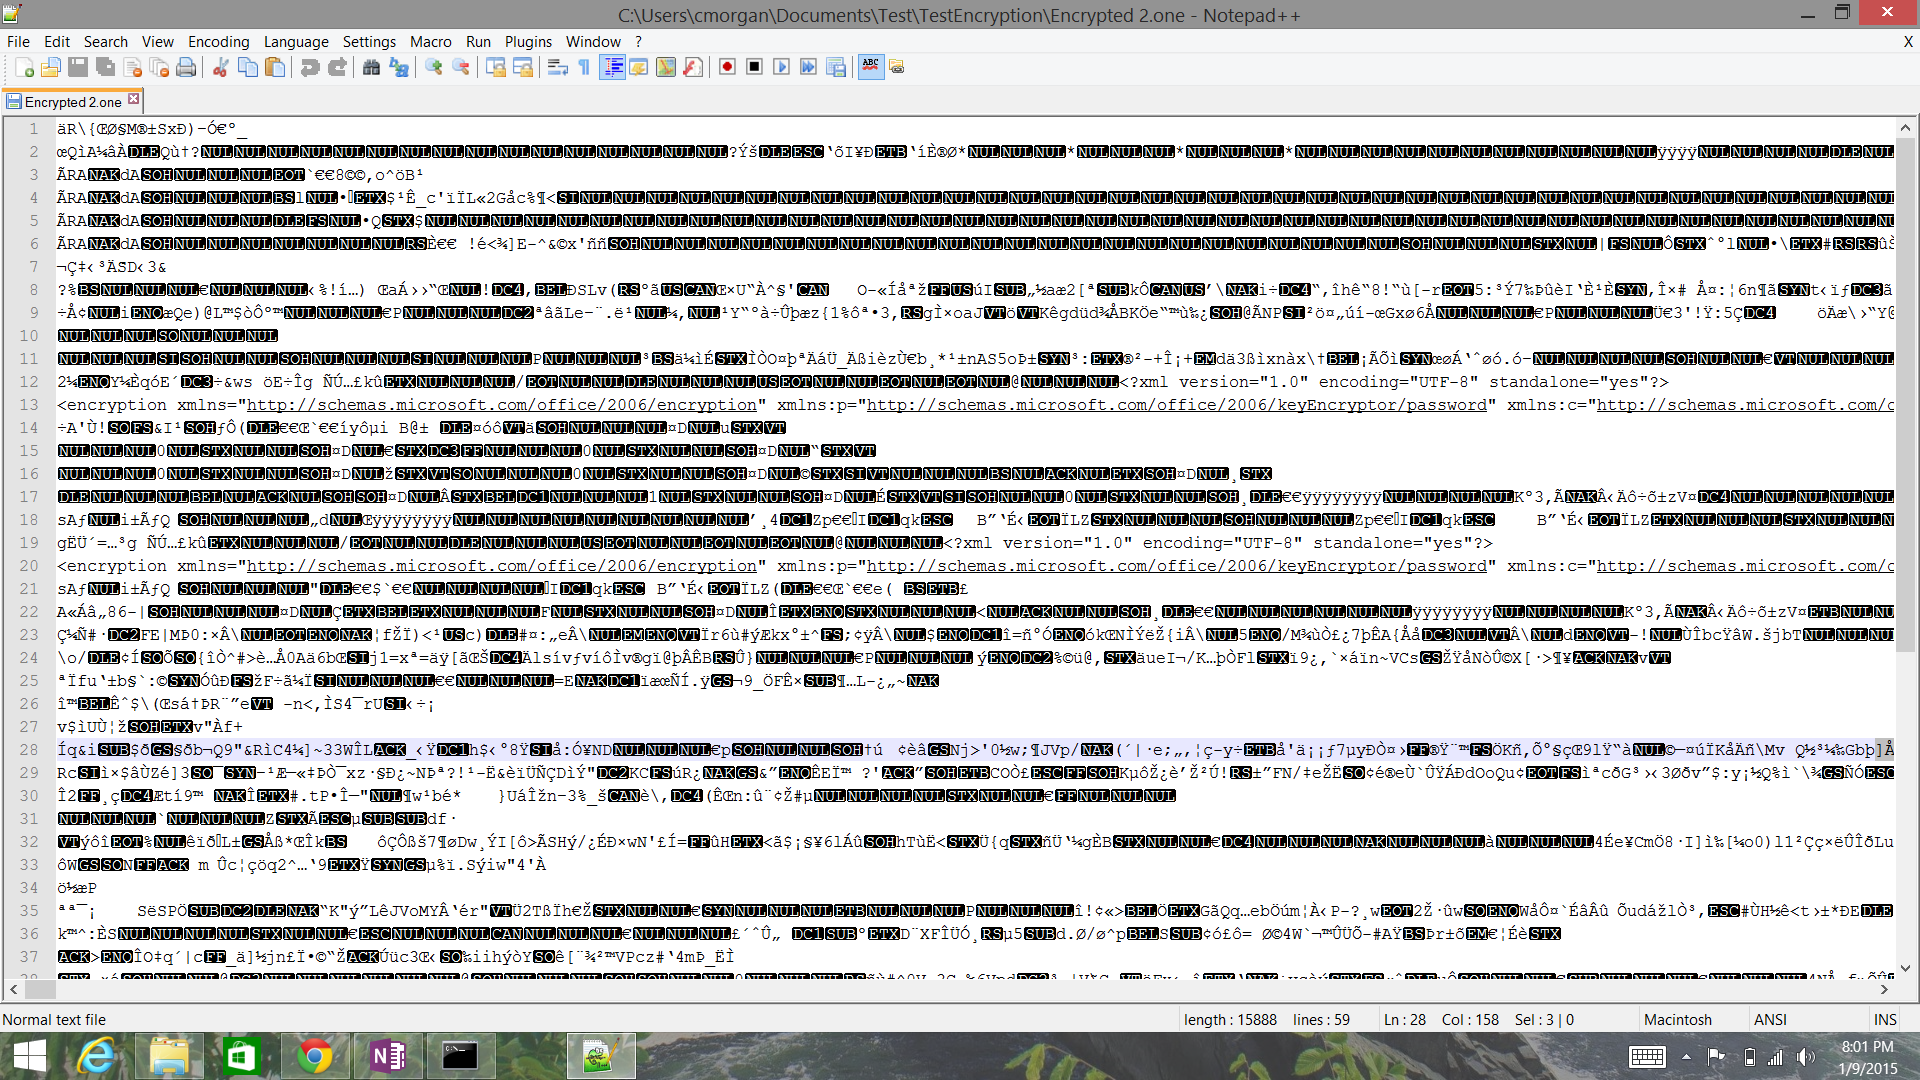
Password Change Behavior: Salts
As we can see in the screenshot below, a new saltValue is generated when a password has been changed, which means that the user's encryption key (used to encrypt the intermediate key) is changed as well. This prevents a number of attacks, but especially attacks where a malicious actor may have found the saltValue of the keyEncryptor in the document, then generated a large number of potential keys offline based on well-known passwords and come back to decrypt the file, only to find the saltValue had changed. This is certainly secure and proper behavior.

Additionally, salt values are changed when a section is copied, meaning that two sections do not have the same key protecting the intermediate key:

Password Change Behavior: Intermediate Keys
What is not immediately obvious in examining the encryption settings is whether or not the intermediate key is changed when the password is changed. Functionally, this does not need to occur because the user's password is used to encrypt only the intermediate key, not the document itself. Therefore, when a password is changed, OneNote can simply decrypt the intermediate key with the old password and encrypt it with the new password, then keep using it for the purpose of protecting the OneNote section.
The TechNet article states that for Excel, PowerPoint, and Word, the default is to not generate a new intermediate key when a password is changed, but it makes no mention of other Office products.
In order to determine whether or not the intermediate key is changed and the section is re-encrypted after a password change, I did a password change and compared the body sections from before and after.
Before:
After:
Those of you with excellent eye sight can see that the body cipher text is completely different, indicating that a password change does indeed cause the generation of a new intermediate key and a re-encryption of the section.
Conclusion
Microsoft has clearly improved the default encryption settings and behaviors in OneNote 2013 over previous version. OneNote 2013, at least when installed through the Office 365 Home program as I have done, by default:
- Encrypts sections with AES-256
- Uses SHA-512 for hashing operations
- Iterates the hashing of the user's password 100,000 times before using it as an encryption key
- Creates a random byte array to use as the section's actual encryption key, called the intermediate key
- Only uses the user's password to create a key to encrypt the intermediate key
- Changes salt values when the section's password is changed
- Appears to change the intermediate key and re-encrypt the section when the section's password is changed
The design of encryption in OneNote 2013 clearly exceeds common industry practices for secure cryptographic implementations.